Table of Contents
Main window

Toolbar
The toolbar is completely customisable to your liking via the database designer, below is the default toolbar explained.
| Command | Description | |
|---|---|---|
| image | New entity | Add new entity |
| image | Import entities | Open the import window |
| image | Tag manager | Open the tag management window |
| image | Search database | Open the search window |
| image | Quick search database | Open the quick search window |
| image | Reload filter | Reload the entire object list |
| image | Adjust filter columns | Adjust the columns of the current filter |
| image | Export filter | The entire object list export |
| image | Print filter | Print the entire object list print |
| image | Pasteboard filter | Copy the entire object list to the Windows clipboard copy |
| image | Delete selection | Delete all selected objects in the object list |
| image | Export selection | All selected objects in the object list export |
| image | Print selection | All selected objects in the object list print |
| image | Clipboard selection | Copy all selected objects in the object list to the Windows clipboard copy |
| image | Action selection | One action on all selected objects in the object list |
Availability
The toolbar buttons cannot be used when no database is open.
Status bar
The status bar displays the following information.
| Meaning | Description | |
|---|---|---|
| image | Application version | The current version of Database Application Pro |
| image | Zoom level | The current zoom level of the font |
Actions
Database creation
The first step to start using the program is to create a new database, you do this by selecting the New database… option.

Open database
If you want to open an existing database, use the Open database… function. If no database is currently open you will see this option directly in the middle of the main screen, in addition the open database function is always available via the File menu.

In addition, it is possible to directly open a previously opened database by selecting the menu item Recently opened This will show the 10 most recently opened databases. When you click a database, it will then be opened immediately, assuming the database file is still present at that location. If the database file is no longer present, you will get an error message saying the file was not found.
The Recently opened option can be switched off in the application settings window.

Database editing
If you want to edit the structure of your database you need to use the database designer application, this application can be launched directly from the view application by selecting the Database designer… option.

If you currently have a database open in the view application, the database designer will directly open your currently open database, in which case you will be shown a window that waits until you have finished modifying your database structure to directly open the database again in the view application.

Overview
The main window consists of three main sections, described separately below.
- Object list
- Summary
- Filter tree & Tag list

Object list

Status bar
The following information is displayed in the status bar of the object list.
| Meaning | Description | |
|---|---|---|
| Plate | Time-dependent | The search that fills this list is time-dependent |
| Plate 0 / 6 | Selection of total | Indicates how many objects are currently selected from the total number of objects in the list |
| Plate 23-3-2022 20:06:19 | Load time | The timestamp when the data was retrieved from the database |
Selection & filter buttons
The selection buttons can only be used when at least one object is selected in the object list. A selected object in the object list has a blue or grey background.


The filter buttons, identified by the funnel icon, apply to the entire contents of the object list.
Actions
The object list is the core of Database Application Pro, in this list the objects are presented to you in tabular form.
The object list consists of three parts.
- The columns
- The content
- The sorting
Columns
The database database defines a default set of columns which is used by default for all new filters, separate searches or selections based on tag. This also defines the line height, the line height is especially important when you want to display images in the object list. An image is automatically made suitable for the line height and cell width in which the image is displayed.
The width of a column can be changed by stretching or shrinking it in the object list, the width changes will be saved immediately if it is a filter. You can do this by hovering on the end of a column with your mouse cursor, an icon will appear  . When you now press the left mouse button you can adjust the column width. When you release the left mouse button again, the changes will be saved.
For a single search or selections based on tag, the default set of columns is always used and width adjustments are not saved.
In addition, you can also let Database Application Pro choose the correct width for a column itself, this is done by double-clicking on the separation from the next column when the split icon is visible. The programme will scale the column to the most appropriate length. This is at least the length of the column of text, e.g. Place, and at most the length of the cell content, e.g. Amsterdam.
For more information, see the filter properties window and the default column definition in the database designer.
Content
The content of an object list can come from different sources, this can be recognised by the tab icon. Below is an overview of the different sources of data.
| Assignment | Description | Origin |
|---|---|---|
 | Display of a filter | Filter tree |
 | Display of a search | Search |
 | Display a tag selection | Tag list |
If you want to find out which search conditions are used for a particular object list, you can retrieve them by choosing the context menu of the tab and then the option Display conditions option.

Sorting
In addition to the default column settings, Database Application Pro also has a default sorting setting, this is set in the same location as the column settings.
When you query an object list, the data will already come sorted from the database, in addition you can choose to sort the view in a different way. You do this by left-clicking on the desired column. If you then want to reverse the sorting, you do so by clicking on the sorted column again. The sorting will now reverse.
Context menu entities
Besides the display of the object list, the context menu is also an important element of the object list, the context menu applies to the selected entities. The context menu is displayed when you right-click on an object, this can be one object or a selection of several objects. Using the context menu, you can quickly perform an action on the selected objects.

Display entity properties
Selecting the top option opens the properties window of the selected entity, or entities. If you select multiple entities, there is a limit to the amount of properties window you can open at once.
In addition, you can open the properties window of a single entity by double-clicking on the entity line in the object list.
Delete entity
Using the Delete it is possible to delete the selected entities, then a confirmation is requested and the entities to be deleted are displayed separately in an object list with the standard columns.
Note that deleting entities is NOT undoable.

Managing entity tags
In the sub-item Tags it is possible to directly add new tags to the selected entities, remove all entity tags or remove specific tags. The chosen action applies to all selected entities.
Summary

Actions
The summary panel provides a summary of the all available fields of a given object. The data can be spread across different tabs to keep the overview. The function of the summary panel is to display an object without having to open the properties window. In the summary the data is not editable, for that the properties window should always be used.
The order and quantity of tab containers and tabs are determined in the database designer determined. You can configure this as you wish.
When an image tab actually contains an image it is recognisable by the icon of the tab (image), if no image is present it is displayed as via the next icon (image). When a text field tab actually contains a text this is recognisable by the icon of the tab (image), if no text is present then if is displayed via the next icon (image).
Settings
 The summary panel supports a number of options, these options are set via the menu bar of the main window.
| Command | Description | |
|---|---|---|
Display | When checked, the summary panel will be displayed. | |
| image | Gridlines | Determine whether gridlines are displayed in the summary tabs. |
Images
If there is sufficient space for the image it will be displayed centred, however, if there is insufficient space the image will be resized to fit the available space.
Below you can see how the programme will resize an image when it does not fit full size on the screen.
| Full-size image | Image has been reduced to fit the screen |
|---|---|
 |  |
Filter tree

Actions
The filter tree displays all filters within the database, clicking on a filter will display the data in the object list. If the filter has not yet been loaded currently it will be added to the object list view as a new tab. In case the filter is already open but is not the currently selected tab the tab will be displayed, is this case the data in the object list is not reloaded.
Should you want to select the filter without displaying the object list. Then select the filter node while pressing the Shift button.
The filter tree can be divided into folders so you can store your filters in a structured way. A folder only exists for placing filters in, when you click on a folder it has no effect on any object list currently displayed. In addition to standard folders, there is also one main folder Search queries, which is always present and cannot be deleted. From the main folder you can add filters and/or folders to shape the filter tree.
The filter tree is displayed based on alphabetical order of folders, followed by the alphabetical order of filters.
Add folder
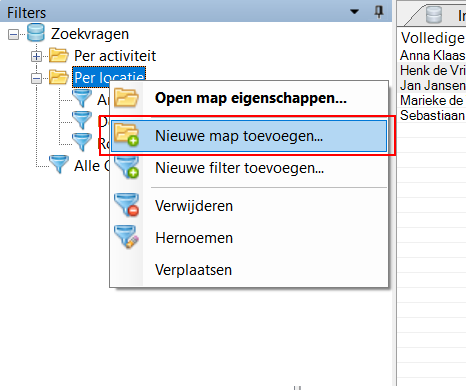
Adding a new folder to the root folder is done by right-clicking on the root folder Search queries and selecting the item Add new folder… item.
To add a folder to an existing default folder, do the same with your right mouse button and then select the option Add new folder… option.
It is not possible to add a folder to a filter, a filter is always an end point in the filter tree.
| Main folder | Default folder |
|---|---|
 |  |
Then choose the name of the new folder and it will be added directly to the filter tree.
Add filter
Adding a filter works the same way as adding a folder, however, you choose the option Add new filter… from the context menu.
It is not possible to add a filter to a filter, a filter is always an endpoint in the filter tree.
When creating a new filter, you specify the name of the new filter, then you can immediately build the search query for your new filter. If you do not enter any conditions, the filter will display all entities in the database. After adding it, it will automatically open in the object list.

After you have created the filter, you can modify it later by opening the filter properties window by double-clicking on the filter or via the right-click context menu.
Rename filter/folder
There are two ways to rename a filter or default folder, the first is by slowly clicking twice on an item from the group tree, the name will now become customisable. The second way is by right-clicking on the desired item and clicking on option Rename option. The name will be changed immediately when you press Enter To cancel the change, press the Escape key must be pressed. The root folder cannot be renamed.

Delete filter/folder
Deleting a folder or filter is done by selecting it and right-clicking the Delete option. There will be a confirmation before the item is actually deleted, note that this action is NOT undoable. The root folder cannot be deleted and always remains present.
When deleting a filter, no entities are deleted, only the filter itself and associated conditions of the query.
If you delete a folder that still has underlying folders and/or filters, these underlying items will also be deleted. Note that this action is NOT undoable.

Move filter/folder
It is possible to adjust the location of a filter or folder by moving it, this is done by selecting the item you want to move and then using the right mouse button to open the context menu where you can select the option Move option. A new window will open in which you specify the new location of the filter or folder, this is also called the new parent folder. As only folders can contain underlying items, only folders are displayed. The current folder you want to move is not displayed. When you have chosen the new parent folder you want, click OK and the change is immediately applied in the filter tree.
In the example below, the filter Seat is added to the folder By brand.

Tag list

Toolbar
All the buttons from the toolbar are explained below.
| Command | Description | |
|---|---|---|
| Image | Reload | Reload the tag list |
Search operator | Search operator used for selected tags search | |
| Tag | Start search for selected tags | Start search for entities with selected tags |
Actions
The tag list allows direct searches based on tags, with this you can easily select entities that have a particular tag. The tag list offers you two ways to start a search.
Search based on one tag
If you want to start a search for entities containing one particular tag, this is possible by selecting the desired tag in the tag list with the mouse. A new object list is then loaded with all entities containing the selected tag.
In the example below, the tag Edition 2021 is selected. The object list bears the name of the selected tag.

Searching based on multiple tags
Besides a single search, it is also possible to search based on multiple tags. For example, it is possible to search entities based on the following operators.
| Operator | Description |
|---|---|
Contains one of the following | Specifies that if an entity contains at least one of the selected tags, it will be included in the result |
Contains all of the following | Specifies that an entity must contain all selected tags before it is included in the result |
After ticking the tags and selecting the desired operator, start the search by clicking the lightning button in the toolbar, then a new object list is displayed with the search results. The object list carries the name of all the tags in sequence.
In the example below, all contacts that participated in Edition 2020 and/or Edition 2021.

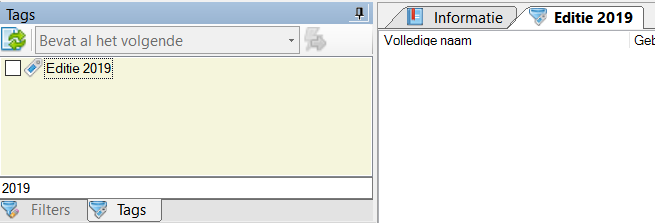
Tag search
When you have built up a large list of tags, it can be useful to search for the desired tag by making the list smaller. Via the Tag search input field, the selected tag list is searched and all tags containing the text you are looking for are displayed. The example below searches for the year 2019.
Hotkeys
Window wide
The following hotkeys are valid across the entire window, they do not depend on the focus on a particular component
| Hotkey | Action |
|---|---|
| F1 | Call up online documentation |
| Alt + F4 | Close application |
| Control + N | Add new object |
| Control + F | Open search |
| Control + Shift + F | Open quick-search |
| Control + E | Full export of current object list |
| Control + P | Print current object list in full |
| Control + A | Select all objects in current object list |
| Control + R | Invert all objects in current object list |
| Control + C | Copy the current selection to the pasteboard, if there is no selection the entire list will be copied |
| Control + Shift + C | Copy from the currently selected entity the complete summary to the pasteboard |
| F5 | Reload current object list |
Component specific
The following keyboard shortcuts are only valid when the focus is on the object list is
| Hotkey | Action |
|---|---|
| Up arrow | Select parent object |
| Down arrow | Select underlying object |
| Page up | Go to parent page |
| Page down | Go to underlying page |
| Home | Go to first object in the list |
| End | Go to last object in list |
| Delete | Delete selected objects |


