Table of Contents
Entity properties window

Toolbar
All the buttons from the toolbar are explained below.
| Command | Description | |
|---|---|---|
| image | New entity | Add new entity |
| image | Clone entity | Clone the current entity |
| image | Save and close | Save changes and close window |
| image | Save | Save changes |
| image | Delete | Delete current entity |
| image | Reload | Reload current entity, unsaved changes will be lost |
| image | Export | Export current entity |
| image | Print | Print current entity |
| image | Pasteboard | Copy current entity to Windows pasteboard |
| image | Actions | Perform current entity action on |
Status bar
The status bar displays the following information.
| Meaning | Description | |
|---|---|---|
| image | Time stamp of last operation | Time stamp of last operation of entity |
 |
Actions
The entity properties window is used to add or edit new entities. Through this window you can access all fields of a given entity.
New entity
When adding a new entity, the current entity data is replaced by a completely new entity. If you had made changes to the current entity then those changes are lost, therefore it is important to save your existing changes. A new entity is not yet saved in the database, only when you save the entity will it be saved in the database and will be given a unique ID.
If a field has a default value, that value will be entered directly.
Clone entity
Clone does the same action as adding a new entity, however the data from the previous entity is left behind and is the basis for the new entity. This function is useful when you want to enter several almost identical entities.
It is only possible to clone an already saved entity.
Save entity
When saving the entity, all field values are stored in the database. In addition, the last edited timestamp is updated to the time of saving, if it was a new entity it is given a unique ID. Finally, the mark Unsaved data present is undone, as all data is now saved. If you make another change after saving, this mark will return.
When you save an entity the main window reloads the current list view, if your just added entity meets the search values of the current object list the new entity will be displayed in it. If the saved entity is currently displayed in the summary window, then the summary is also reloaded so that you see all changes in the main window.
After saving, the entity is reloaded from the database, causing all the age fields and compound fields (calculated fields) are determined by the database, you will therefore see the values of those fields in the properties window. These values are always determined when the data is read from the database, as it is the database that calculates the values and not the display application. This also applies to already existing entities, the calculated fields are redefined when saving the entity.
| Before saving (new entity) | After saving |
|---|---|
 |  |
Reloaded entity
When reloading the entity, the entity is reloaded from the database, any changes that had not yet been saved are lost.
Delete entity
When deleting an entity, it is permanently removed from the database, this action in irreversible. After deleting the entity, the window is provided with a new entity.
Tabs
As you can compile all fields yourself, this window depends on how you have built your database. All fields are grouped per category in a tab; the order of the tabs is up to you and is not alphabetical. For each tab, all fields of that category are then displayed, again the order is determined by yourself and is not alphabetical.
Each field is displayed based on the data type of the field, a string field looks different from an integer field for example. All available fields are explained below.
Entity fields
Each entity field is displayed based on the data type of that field, this gives you the most user-friendly way of entering data tailored to the data type. Each field type is described separately below.
Character field

The character string field is the simplest field and accepts all characters. The data length limit can be set via the database designer, as well as an optional default value. The field allows standard Windows actions such as copy and paste and the standard context menu via right-click.
Integer field

Whole numeric numbers are entered via the integer field, it is only possible to enter the characters 0-9 and the minus sign (-) here. The minimum, maximum and default values are determined in the database designer.
Using the arrows on the right-hand side of the input field, you can increase or decrease the numeric value by 1 with the mouse. This is also possible via the up & down arrow key.
Decimal field

Decimal, also known as comma numbers, are entered via the decimal field. You can enter any characters here, however, the field will perform a check whether the entered data can be converted to a decimal value. If this fails, you will be shown a message. The minimum, maximum and default values are determined in the database designer.
For example, it is possible to enter the following data:
| Data | Description |
|---|---|
| 3 | A whole number is also a valid value |
| 3.0 | A whole decimal number is a valid value, is converted to 3 |
| 3e5 | A valid value, is converted to 300000 |
| 3e28 | A valid value, is converted to 3E+28 |
| 3.25e50 | A valid value, is converted to 3.25E+50 |
| inf | A valid decimal value and meaning positive infinity, is converted to ∞ |
| infinity | A valid decimal value and meaning positive infinity, is converted to ∞ |
| -inf | A valid decimal value and meaning negative infinity, is converted to -∞ |
| -infinity | A valid decimal value and meaning negative infinity, is converted to -∞ |
Date field
 Dates are entered via the date field, it is possible to type in a date yourself using day-month-year notation.
In addition, you can select a date with the mouse by clicking on the right arrow, a dropdown becomes available in which you can choose the desired date.
Dates are entered via the date field, it is possible to type in a date yourself using day-month-year notation.
In addition, you can select a date with the mouse by clicking on the right arrow, a dropdown becomes available in which you can choose the desired date.
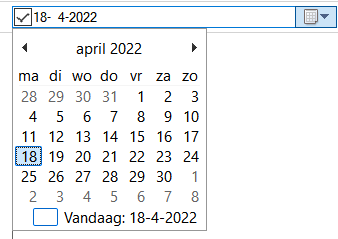
It is not compulsory to enter a date, if you do not wish to enter a date then make sure there is no tick in the left-hand selection box by clicking on it with the mouse.
Time field
 Via the time field you enter a time, it is possible to type in a time yourself via hour-minute-second notation.
It is not compulsory to enter a time, if you do not want to enter a time then make sure there is no tick in the left-hand selection box by clicking on it with the mouse.
Age field
 The age field is read-only, you can make adjustments to the age by modifying the linked field. Which field that is you determine via the database designer, which can be a
 date field or numeric field be. The age is determined at the time the data is read from the database, which is at the times of saving, reloading and loading the entity.
Birthday field
 The birthday field is read-only, you can make adjustments to the birthday by modifying the linked field. Which field that is you determine via the database designer, which can only be a
 date field be a date field. The birthday is determined at the time the data is read from the database, which is at the times of saving, reloading and loading the entity.
Boolean field
 The boolean field is a simple yes/no field, if there is a tick it means a
 yes, if the box is empty it means a no.
Field colour
 Via the colour field you can enter a desired colour, a colour can be selected by double-clicking on the colour frame or via the [image] button to open the colour selection window.
 Then select a colour and click on the
 OKThe colour is now adopted in the colour box.
It is also possible not to enter a colour, delete the current colour by clicking on the button with the cross [picture]. The colour will now be removed and the button with the cross will be disabled. If the button with the chaste [picture] is disabled, recognisable by the grey background, no colour is present.
Text field

The text field is similar to the character string field and accepts all characters. The difference with the character string field is that here you can enter texts consisting of multiple lines of text. The data length limit can be set via the database designer, as well as an optional default value.
The field allows standard Windows actions such as copy and paste and the standard context menu via right-click. In addition, it is possible to drag and drop text directly into the field from other applications, e.g. from a web browser.
Image field
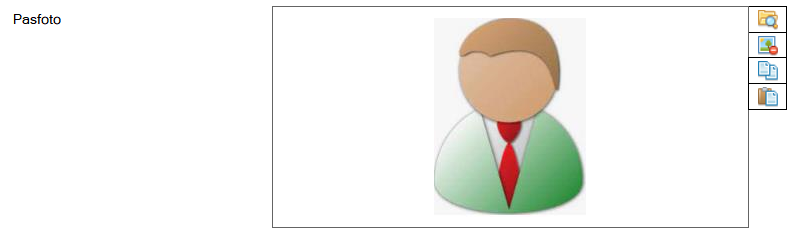 An image is managed via the image field, by double-clicking on the image frame you will get a selection window to choose the image from your computer. After opening the image, the image is checked to see if it fits within the maximum dimensions defined via the database designer. If the image is larger than the maximum dimensions, it is automatically scaled up to fit. Choosing an image can also be accessed via the [image] button
 Choose image….
Deleting the current image is possible by clicking the [image] button Delete image button. It is only possible to delete the image when a currently selected image is available, when no image is selected the button remains disabled.
Via the [image] button Copy and [image] Paste it is possible to load an image from the Windows Paste Board. It is also possible to load an image via drag & drop, by dragging a file directly into the image frame from Windows Explorer.
From a web browser, it is also possible to load an image directly via drag & drop, although it depends on how the web page is structured. Basically, the simpler the HTML structure of the web page, the more likely it is that the image can be loaded directly.

Enumeration field
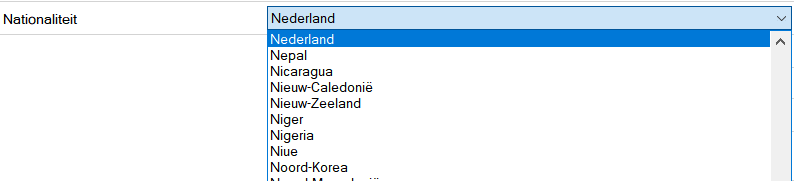
 Through the enumeration field, you choose the value for the given enumeration field. And enumeration field must always contain a value and, for new entities, contain the default value as determined in the database designer. In the database designer, you also define the list of items to be displayed, the order of display is alphabetical.
Clicking the right arrow will display the available items in a list.
Compound field
 The compound field is read-only, you can make adjustments to the content by modifying the linked fields. Which one is determined by the database designer. The value is determined at the time the data is read from the database, which is at the times of saving, reloading and loading the entity.
Id field (system field)
 Through this field you see the unique ID of the entity within the database, this field is read-only and is determined at the time you first save an entity.
This field is always present.
Through this field you see the unique ID of the entity within the database, this field is read-only and is determined at the time you first save an entity.
This field is always present.
Last edited field (system field)
 Through this field you can see the last edit timestamp of the entity, this field is read-only and is updated the moment you save an entity.
This field is always present.
Through this field you can see the last edit timestamp of the entity, this field is read-only and is updated the moment you save an entity.
This field is always present.
Entity tags

Actions
Through the tag manager, linked tags to a given object are easily managed. Through the manager, you can link, unlink and add new tags to a given entity. An entity can be linked with multiple tags, a tag can be linked to multiple entities.
Button bar
| Command | Description | |
|---|---|---|
| image | Add all tags | Add all existing tags to the selected tags list. |
| image | Add selected tags | Add all selected tags to the selected tags list. |
| image | Remove all tags | Remove all tags from the selected tags list. |
| image | Remove selected tags | Unlink all selected tags from the selected tags list. |
Besides the buttons, there is also the possibility to double-click on a tag with the mouse, when double-clicking on a tag in the available tags list, it will be added to the selected tags list. The other way round also works by double-clicking a tag from the selected tags list will unlink it.
Available tags list

This list contains all available tags in the address book. In addition to existing tags, you can also create new tags in the tag manager.
Enter the new tag name in the text box next to the 
Add new tag, when the tag name is entered correctly, you can press the button and the tag will appear in Available tags list.
The new tag can be used immediately and will be available in the entire address book. Further tag management options such as deleting and modifying can be found in the tag management window.
Besides adding new tags, there is also the option to search all tags. When in the Search tags enter a search term, the list will be searched directly. All results will be displayed and the list will turn beige in background colour. The tags are matched on containing the search term.
Selected tags list
This list contains all the tags that are matched to the object.
Tag search
When you have built up a large list of tags, it can be useful to search for the desired tag by making the list smaller. Via the Tag search input field, the selected tag list is searched and all tags containing the searched text are displayed. The example below searches for the year 2019.

Navigation
Within the entity properties window, it is possible to switch between the different data fields quickly and directly via the keyboard. When the window is opened, the input focus is placed on the first field of the first tab. By pressing the Tab button advances one field. When a field contains multiple elements, you first go through all the elements of that field, e.g. field 1 and 7 in the image below. If the focus is on the last button of field 1 and you press the Tab button, then the input focus moves to field 2.
In case the input focus is on the last field within a tab, the focus will go to the tab element when you press the Tab Click. You can use the left & right arrow keys to move between the different tabs. Once you have selected your desired tab and then click on Tab the entry focus moves to the first field of that tab.
This allows you to navigate completely through the window without using a mouse.
Via the key combination Shift + Tab right selects the previous element.
The image below shows the sequence of the Tab button, at element 1 to 8, from 8 to 10 you can see the order of the arrow buttons.

Shortcut keys
Window wide
The following hotkeys are valid across the entire window, they do not depend on the focus on a particular component
| Hotkey | Action |
|---|---|
| F1 | Call up online documentation |
| Alt + F4 | Close window |
| Control + N | Add new entity |
| Control + Shift + N | Save changes and clone entity |
| Control + S | Save changes |
| Control + Shift + S | Save changes and close window |
| Control + P | Print entity |
| Control + E | Export entity |
| Control + Delete | Delete entity |
| F5 | Reload entity |
Component specific
Available tags list
The following shortcuts are valid when the focus is on the available tags list is.
| Hotkey | Action |
|---|---|
| Arrow key-right | Add selected columns to Selected tags list. |
Selected tags list
The following keyboard shortcuts are valid when the focus is on the selected tags list is.
| Hotkey | Action |
|---|---|
| Arrow key-left | Remove selected columns from Selected tags list. |


