Table of Contents
CSV document import
Settings window

Toolbar
No
Status bar
No
Actions
Within this window, select the CSV file you want to import and choose the options you want to use to read the file.
Options
Field separator
CSV stands for comma-separated values/comma-separated valuesbut the separator is not always a commabut often a semicolon. Via this option, you specify which character is used as the field separator.
In the example below, the separator is a semicolon.

Coding
Via this option you choose the encoding of the CSV file. This may be necessary in special cases, normally UTF-8 is sufficient to read special characters as well.
Ignore first row
Often in a CSV file, the first row is the header containing the column names. This option allows you to ignore the first row so that the column names are skipped and not entered as entities in your database.

Use first row as column names
This option ensures that the values of the first row are used as column names in the read dataset. This offers the advantage that while linking the data, you will see the different column names with a clear name. If this function is off, the columns are numbered in ascending order.
Culture for reading data
Through this option, you determine which cultuur are used for reading data. This is applicable for reading dates. If you are using a Dutch Windows, it is common for the date notation to be day-month-year is. In case you are going to read a CSV file exported by programme with an English culture, chances are that the date notation will be month-day-year in order to still read these dates, you should manually set the culture to English set the culture.
Shortcut keys
Window wide
The following shortcuts are valid across the entire window, they do not depend on the focus on a particular component
| Hotkey | Action |
|---|---|
| F1 | Call up online documentation |
| Alt + F4 | Close window |
Component-specific
No
Import window

Toolbar
All the buttons from the toolbar are explained below.
| Command | Description | |
|---|---|---|
| image | CSV database browse… | Open the settings window again to choose a CSV again |
| image | Reload file | Reload the CSV document again |
| image | Open file in editor… | Open the CSV file in an external editor |
| image | View data… | View the raw data |
| image | Import | Start importing the data based on the links created |
Status bar
The status bar displays the following information.
| Meaning | Description | |
|---|---|---|
| image | Culture for data read | The cultuur with which the data is read from the data source |
| image | Data lines | The number of lines found in the import file |
Actions
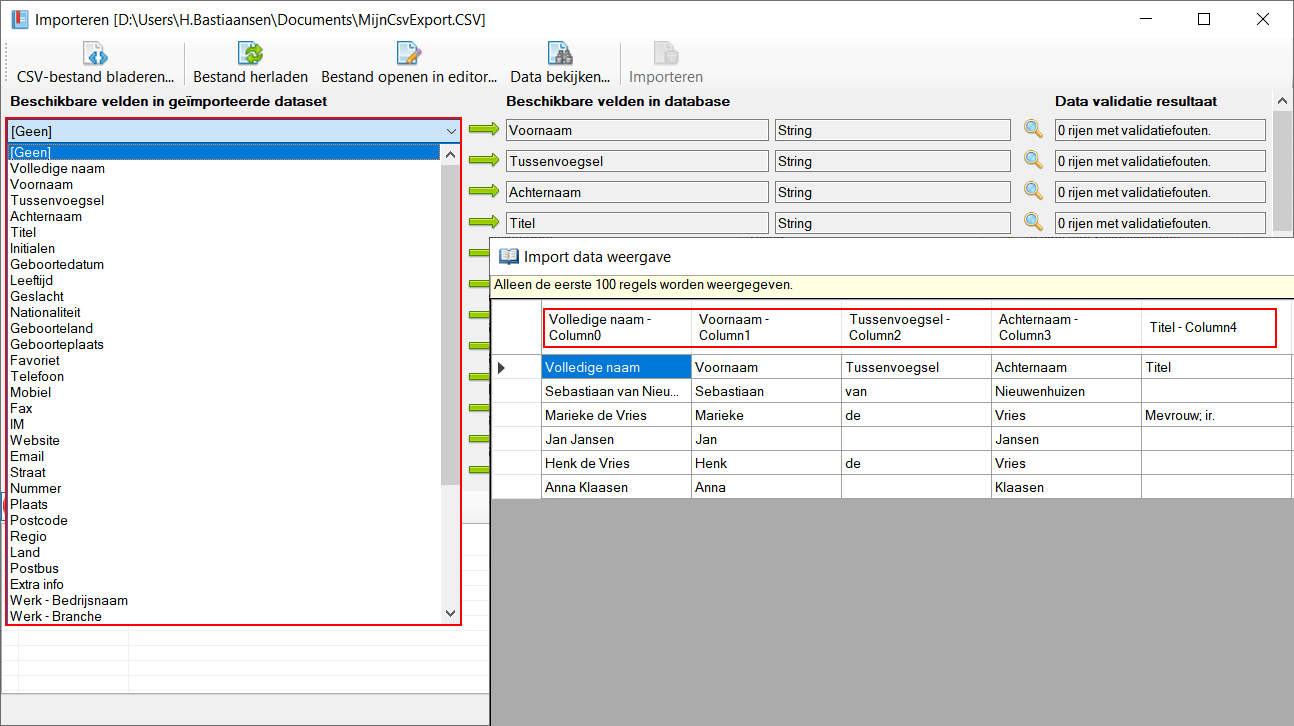
Link data
In this window, you create a link between the fields found in the import file (left) and the fields available in your Database Application Pro 7 database (right). After linking an import field (left) to a database field (right), a data validation is performed, it checks whether the data you want to import does match the required data type of the database field (right). This prevents invalid data from entering your database.

Only one import field (left) can be linked to each field in your database (right). However, it is possible to link an import field (left) to multiple database fields (right) as long as the data validation succeeds.
It is only possible to start the actual import when there are no validation errors.
In case the data validation fails, you will see a line in the result window for each failed validation field. This will specifically name which data cannot be converted to the desired data type. This provides you with a handle to correct the data to be imported.

When importing, each line is converted to a new entity by default, unless a link has been made to the Id database field (right).
The Id database field (right) is a special field, this field contains the entity's internal database id. By attaching an import field (left) to this, there are two options when importing a data line:
- If the id already exists in the database, the linked fields of this existing entity are updated when importing.
- If the id does not yet exist, a new entity is created, and the specified id is ignored.
This function allows you to update your entities with the imported data.

Importing data
By clicking on the Import in the toolbar, the actual import is started based on the linked fields. This button is only available when no data validation errors occur.
With every import action, a unique tag is created and linked to all new and/or updated entities, allowing you to immediately find all entities within your database. Of course, you can remove this tag again after importing if you wish.

Viewing raw data
It can be useful to know exactly how the programme reads the data from the import file, think of special characters, file encoding. Therefore, you can use the View data… button in the toolbar, you can view the data to check that the data is read in correctly and, if necessary, you can find the correct columns in the source data.

Shortcut keys
Window wide
The following hotkeys are valid across the entire window, they do not depend on the focus on a particular component
| Hotkey | Action |
|---|---|
| F1 | Call up online documentation |
| Alt + F4 | Close window |
Component-specific
No


